Curves and the 'Unsharp' Mask

Photoshop has such a wide variety of potential uses that it is virtually impossible to pin down one main environment in which it is most often used. The program is a vital tool for graphic designers photographers and layout artists alike, but within photography there is one area in which it particularly excels: subtle touching up.
There are a few basic touch-ups, such as Brightness and Contrast or Colour Balance, that are covered elsewhere on this site. However, all of these facilities have fundamental flaws and limitations when used for all of the most slap-dash of applications. If you really want to get the best from your images using some subtle digital manipulation, then you will need to delve slightly deeper into the program. Imagine Photoshop as a digital darkroom: you have an almost unlimited number of tools at your disposal, and learning to use each one will grant you even more artistic freedom.
Curves
One of the most important tools that you will come across in Photoshop is called Curves. This is the cornerstone of the program for many digital photographers, and presents the user with a variety of options. Curves shows the user a square graph, with input levels on the bottom and output levels on the left. Input levels represent the current intensity of each level on the tonal range, while output levels represents the changes that will be made. A diagonal line runs from the bottom left of the graph to the top right, and this line can be grabbed and moved by the user. Up to 14 different points can be created, allowing you to alter the intensity of the full tonal range.At the top of the dialog box, you will also see a drop-down menu listing a variety of different colour channels. This allows you to make precise alterations to every single channel in your image. Finally, you will also see a series of pipettes at the bottom right. You can use these to set the white, black and gray points of your image. This gives you the option to tell Photoshop an absolute value for each of these individual tones.
Unsharp Mask
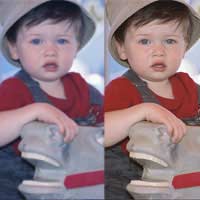
Another of the most important touch-up tools at the photographer’s disposal is the Unsharp Mask. This has been a tool that has borne the brunt of the anger of some of those who dislike digital because it supposedly encourages bad photography. However, for those who see Photoshop as a tool rather than an enemy, the Unsharp Mask can be vital.In many situations it is very difficult to get a totally sharp image. This could be due to any number of factors: low light may preclude you from focusing properly, your subject may be moving very quickly; indeed, more often than not the quality of the glass in the lens being used is not high enough to create as pin-sharp an exposure as you might desire. In these instances, the Unsharp Mask can help.
The tool can be found in the Filter / Sharpen menu. When it is clicked you will be presented with a dialog box showing a live preview of a segment of your image, along with a selection of three numerical faders. Essentially, the Unsharp Mask sharpens your image by looking for pixels which are substantially different to those around them. It then increases the contrast between these pixels in order to give the impression of sharper lines; the Unsharp Mask does not look for any edges in your image in the way that some other sharpening tools do.
Operation
The first of the three faders is marked Amount, and is expressed as a percentage. When this fader is dragged to the right, the ratio by which the contrast of the affected pixels will be altered increases. The second fader is marked Radius; this is expressed as a number of pixels, and describes the distance around each individual pixel that Photoshop will look in order to find contrasting areas. If, therefore, you are looking to sharpen wider areas of colour and tone, then you would increase the radius.The final fader is marked Threshold. This is expressed in ‘levels’; the threshold describes the limit of contrast below which Photoshop will not alter adjacent pixels. Lowering the threshold, therefore, will increase the total area that will be sharpened.It should be noted that images tend to appear more highly sharpened when displayed on screen than they do in print; therefore, if your images are ultimately going to appear as hard copy, you may need to experiment with your sharpening levels.

Re: Photography Copyright Law
Hello, My name is Kimberly Wood and I run a business selling movie DVDs, and Blue-Rays. Both music and movies for me have always…
Re: Storing Your Photos Online
Flickr is fine just as a photo site, but plenty of people put pictures in albums on Facebook, for example, which is one way to store…
Re: Developing Your Own Film and Darkroom Basics
Hi, Please send me the details of new set up of digital color lab and having any expenses and cost of…
Re: What is the Copyright on Old Photographs to Use as Calendars?
Hi, I have an old photograph I got at a flea market, (a snapshot) that I want to use…