Building Your Own Lightbox

Photography equipment of any sort can be very expensive. This is particularly true of 'specialist' or higher-end gear; once a photographer begins to require anything more specialised than an 'amateur' camera, they will find that the costs rise dramatically.
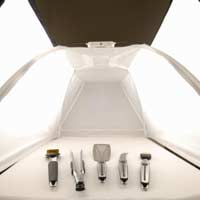
What is a Light Box?
Light boxes are comparatively specialised pieces of equipment - however, they are also cheap and easy to build. In the first instance, it should be noted that the term 'light box' can actually be used to describe two different things: a light box can either be an illuminated platform for viewing transparencies, or it can be a cube-like structure used to light small objects for still photography. This article will deal with the second of these two definitions, as light boxes used for transparencies are becoming progressively less widely used as digital photography continues to grow in popularity.In the sense in which we are interested, light boxes (also known as 'light tents') are used to photograph small objects while eliminating the possibility of casting shadows. Lighting small objects for still photography can pose problems, as the strength of a direct light can obscure details. Light boxes help to ease this problem by acting as a three-dimensional soft box; light is directed through fabrics to reduce its intensity.
Building the Structure
Light boxes are surprisingly easy to build, and require little specialist equipment. The structure is simple - all that is needed is a sturdy cuboid structure over which some fabric can be stretched, a background can be draped, and at which lights can be aimed. This can be achieved quite easily using a cardboard box of a suitable shape. One face of the box should be entirely removed, leaving space for the camera. Large holes should be cut in each of the other faces, but not in the bottom of the box.You should now have the 'skeleton' of your original box. You will require some translucent white fabric, which should be draped across the inside of the faces into which you have cut holes. The fabric on at least one of these faces should be long enough to also cover the bottom of the box. It is important that all of the separate pieces of fabric are of precisely the same colour, in order to ensure a continuous background in your photographs. Furthermore, the staples or tape with which you fasten the fabric should be attached to the outside of the box in order that it does not appear in shot.

Re: Photography Copyright Law
Hello, My name is Kimberly Wood and I run a business selling movie DVDs, and Blue-Rays. Both music and movies for me have always…
Re: Storing Your Photos Online
Flickr is fine just as a photo site, but plenty of people put pictures in albums on Facebook, for example, which is one way to store…
Re: Developing Your Own Film and Darkroom Basics
Hi, Please send me the details of new set up of digital color lab and having any expenses and cost of…
Re: What is the Copyright on Old Photographs to Use as Calendars?
Hi, I have an old photograph I got at a flea market, (a snapshot) that I want to use…